As a specialist in aerospace machining parts and assemblies for aerospace and military applications, Next Intent Inc. is accustomed to earth-exiting challenges. An early one came in 2000, when the shop gained a contract to make the wheels and other components for the 2003 Mars Exploration Rovers—Spirit and Opportunity. Success led to work making several components for the 2011 Mars Science Laboratory (MSL) Rover—Curiosity. Machining was done with three-axis CNC machines, using four-axis positioning for more complex parts.
Since then, according to Rodney Babcock, shop president and CEO, Next Intent has grown to 34 employees and 11,800 ft2 (1096 m2) of space at its San Luis Obispo, CA, location. The shop also began regular use of GibbsCAM five-axis and added GibbsCAM VoluMill from GibbsCAM (Moorpark, CA) for high-speed roughing of parts, primarily from titanium, stainless steel, and aluminum alloys, Next Intent’s latest challenge is making components for the 2020 Rover. The vehicle is equipped to assess natural resources and hazards with instrumentation that includes 23 cameras and a caching assembly to collect drilled rock and soil samples, which will be cached on the Martian surface for future retrieval. In addition to the seven different part numbers Next Intent is making for Jet Propulsion Laboratory (JPL; Pasadena, CA), it is making a mounting chassis, plate and panel for Arizona State University, which provides optical instrumentation for the 2020 Rover.
Aerospace parts often perform a combination of functions to keep total weight low, like a structural component that also houses cables and instruments. Parts that perform multiple functions can be very complex, presenting incremental machining challenges. Two such parts are among the Rover components Next Intent is making.

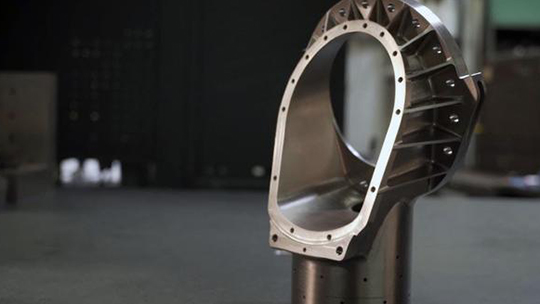
One is the mounting deck component for the caching assembly. The part begins as a flat plate of Ti-6Al-4V titanium measuring about 915 × 410 × 70 mm. After several weeks of machining, the resulting heavily pocketed, thin-walled part measures 900 × 390 × 50 mm. JPL often specifies how a part is to be machined, and if the supplier wishes to deviate from the specified process, JPL must approve the change. For this part, JPL recommended three roughing passes, at 12 , 9 and 3 mm over net shape, and required removal of the part from the machine after each roughing pass to assess distortion and determine if additional stress relieving was needed.
On a feature-to-feature basis, this part is not the most difficult one to machine, according to CNC programmer, Galen Moyer. However, the sheer volume of features on one part made it challenging. For example, some of the pockets have three, four, or five depths, and many internal walls are undercut to reduce weight. As roughing progresses, different areas open, and some walls widen, so each roughing pass is different. Then, the undercut walls need to be finished with form tools.
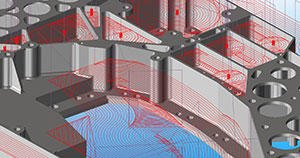
To speed up roughing, Moyer used GibbsCAM VoluMill extensively on this part while keeping a constant load on the cutting tool, eliminating chatter, dwell, and squeal at the corners, and extending tool life. VoluMill follows the programmer’s specified removal volume, or chip size, and generates a continuous, non-stop/start toolpath that minimizes the time the tool is out of the workpiece while maintaining the specified constant load when in the workpiece.

The five-axis positioning became critical in attacking the undercut pockets. One challenge was establishing angular positioning that would not require overextending cutting tools. To do this, Moyer takes advantage of another time-saving feature of GibbsCAM, which helps to establish the coordinate system to be used at the machine. Generally, this is a fast selection of the X-Y plane and Z vector, but when a part needs to be rotated, one can parametrically rotate the coordinate system.
However, parts aren’t always that simple, so GibbsCAM includes a feature called “Coordinate System from View,” which saved Moyer a lot of tedious trial and error. “I would rotate the part so that I could reach what I need to machine without obstruction, set that as my coordinate system, then machine those features,” he explained. “There were a lot of external features on that part, but what was really difficult was getting at all the undercut internal features. I needed four or five repositionings to reach all the undercut features and corners.”
The result is faster material removal than traditional roughing routines, fewer vertical stresses on the cutting tool as it enters the work, and significantly less stress on the machine tool from starts, stops, and sudden changes of direction. Constant loading also enables greater cutting depth, using more of the tool and reducing the number of passes the end of the tool needs to make. However, for this and other large thin parts, depth is restricted to minimize distortion.
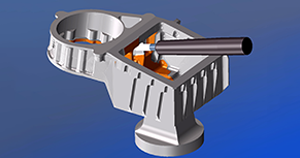
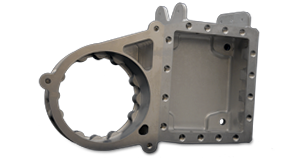
Another part, a wheel restraint fitting, begins as a 7050 aluminum billet measuring roughly 13.5 × 9 × 5″ (342 × 228 × 127 mm) weighing in at about 60 lb (27 kg). Aside from the multiple features around the exterior of the part, a large, square pocket required multiple pockets undercut into its four walls, at nearly 90° to the wall. Moyer said that he used many of GibbsCAM’s 3D surface machining functions after five-axis positioning for several part features. To ensure that he was not gouging or overcutting surfaces, he used GibbsCAM’s “Cut Part Rendering,” which shows the part as machined, including surface finish. Moyer relies on “Remaining Material Change” as his preferred option for analyzing “a cut part,” which compares what his program machines against a chosen reference model, within a tolerance he specifies. Here, he compared the machined part against the finished part. Any gouging or overcutting path shows in red, while remaining material such as unfinished corners show as dark green, indicating if and where corrections are needed. In those cases, GibbsCAM allows changing geometry or single-tool operations and immediately updating just that program segment, without rerunning the entire program.

Some of the difficulty was realized at the machine. A tool reach or approach could cause a problem, in which case the machinist would explain the problem. Moyer would then find an alternative angle that eliminated interference or enabled using a shorter tool. “Being able to make changes to individual operations and quickly updating the program was a big help in proofing the part,” he said.
As they proofed the program, they found another time-saving CAM feature. “We reordered some operations to make things work better, something really easy to do with GibbsCAM,” Moyer explained. “In most cases, it is just a drag and drop. If you are doing a ‘material remaining’ operation, you may need to click ‘redo,’ but otherwise it is really simple.” In GibbsCAM, machining operations are represented by tiles vertically aligned on screen. The programmer can move any operation by moving its tile up or down to the desired position, without any further processing.
For the wheel restraint fitting, JPL required roughing to 4 mm of net shape, then stress relieving, then roughing to within 1–2 mm of net shape, then stress relieving, before final machining. “Those parts got a lot of mileage on the machine,” Moyer added, “with a lot of five-axis positioning.”
“From the time we began using GibbsCAM in 1996 the complexity of work has grown, and GibbsCAM has kept pace with us, enabling us to take on mill/turn, five-axis positioning, or 4+1, and full five-axis work,” said Babcock. “We’ve aligned ourselves with the supplier of a CAM system that has all the tools we need.”
For more information about Next Intent, visit www.nextintent.com
Courtesy of Manufacturing Engineering - March 2018

